
 [ad_1]
This post may contain affiliate links which means I may receive a commission for purchases made through links. Learn more on my Private Policy page.
Introducing the Pepe Tools Bench Basics Power Sander
Pepe Tools has sent over a small power sander from their Bench Basics line, which comes in a nice looking box. The custom-cut foam packaging makes it convenient for storing all the parts if you don’t wish to keep the sander set up all the time. In this article, we will explore the features of this power sander and set it up for use.
Setting up the Power Sander
The setup process for the power sander is quite straightforward. First, you can mount the sander to your work area using the provided clamp. Alternatively, if you don’t have a suitable place to clamp the sander, you can use the supplied metal block to secure the sander in a vise.
Attaching the Power Sander to the C-Clamp Mount
To attach the sander to the C-clamp mount, unscrew the knob on the clamp and pull out the rod. Then, thread the rod into the bottom of the sander, and lock it in place using the thumbscrew. Now, you can put the rod back into the clamp and reposition the sander by loosening and tightening the knob.
Attaching the Dust Collector Adapter
Before using the sander, you’ll need to attach the acrylic dust collector adapter. Simply remove the two Phillips head screws and attach the adapter securely. Be careful not to overtighten the screws, as this can crack the acrylic.
Adding and Changing Sanding Belts
Putting a sanding belt on the power sander is quick and easy. Ensure the ratcheting tensioner is in the up position, and slide the sanding belt over the wheels. Pull down on the tensioner to secure the belt in place. To release the tension and change the belt, just pull the lever on the bottom of the sander.
Powering the Pepe Tools Power Sander
To power the sander, you will need a Foredom SR flex shaft. Remove any handpiece attached to the flex shaft and plug the flex shaft directly into the sander. For easier alignment, turn the wheel to line up the slot with the key on the flex shaft. The sander will plug in and lock securely into place.
Dust Collection
To collect any dust generated while sanding, connect your shop vacuum to the dust collector adapter. The vacuum should fit perfectly into the adapter. With everything connected, the power sander is ready for use.
Controlling the Power Sander
You have a few options when it comes to controlling the sander’s speed. You can use the foot control for the flex shaft for the most straightforward control. However, if you want to limit the maximum speed and have more precise control, you can use an external adjustment system to set the maximum RPM.
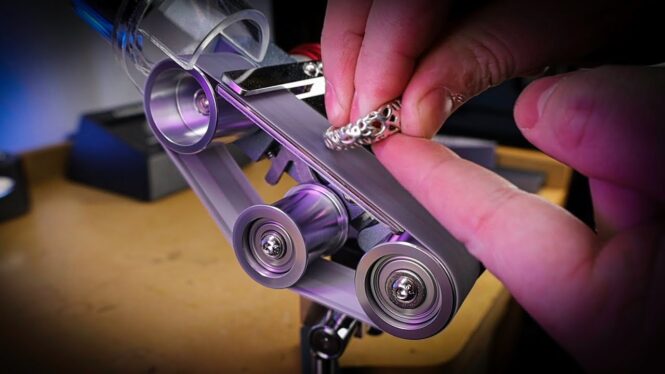
Testing the Pepe Tools Power Sander
To test the power sander’s abilities, we used it to remove the sprue from a cast ring using an 80-grit sanding belt. The sanding belt quickly and effectively removed the sprue. After swapping out the sanding belt for a finer one, the power sander smoothed out the ring, making it ready for polishing.
Additional Uses for the Power Sander
The Pepe Tools power sander is versatile and can be used for various applications, such as rounding corners, shaping pieces or general cleanup work. You can run the sander forwards or backwards, depending on your specific needs and the shape of your workpiece.
Always wear proper safety equipment, such as safety glasses and a respirator, when using the power sander. The dust collector can help minimize dust buildup, but it’s essential to take safety precautions regardless.
Where to Get the Pepe Tools Power Sander
If you’re interested in purchasing the power sander, it’s available on the Pepe Tools website. The sander comes with five different grit sanding belts, and replacements or additional belts can be purchased for $20 for a full set or $5 each.
Let us know in the comments below what you think of this compact power sander and if you’re interested in getting one for your workshop.
In conclusion, the Pepe Tools Bench Basics Power Sander is a practical and versatile tool that can help you with your jewelry making and other crafting projects. Its compact size and easy setup make it an excellent addition to your workspace. Give it a try and see how it can improve your finishing work and overall efficiency.
This post may contain affiliate links which means I may receive a commission for purchases made through links. Learn more on my Private Policy page.
[ad_2]
Source link
